PinIt!

Showing posts with label cast iron. Show all posts

Monday, May 19, 2014

Heavenly Skillet Cookie

I will admit to being fairly afraid of my husband's cast iron skillet. (And yes, I consider it 'his' cast iron.) Once in awhile I will get brave & use it, but I am usually afraid of 1) ruining the food or 2) ruining the cast iron. I know it's cast iron, and pretty much impossible to ruin, but I am still afraid of doing something that would cause it to need some SERIOUS cleaning. So.... I stay away from it. 

...Until I saw this recipe. Cookie in a skillet generally looks very 'blah' to me, but this looked amazing. Chocolate chips, oatmeal, sweetened condensed milk, peanut butter.... Mmmm, some of my favorite ingredients. So I had to give it a try!

(And yes, Nathan was super excited when I texted him at work to tell him I was making something in his cast iron.)

The general consensus is that this recipe is AMAZING. It's not sickeningly sweet (which Nate approves of), but still very rich and yummy! This is going in the "make again, many times" pile!
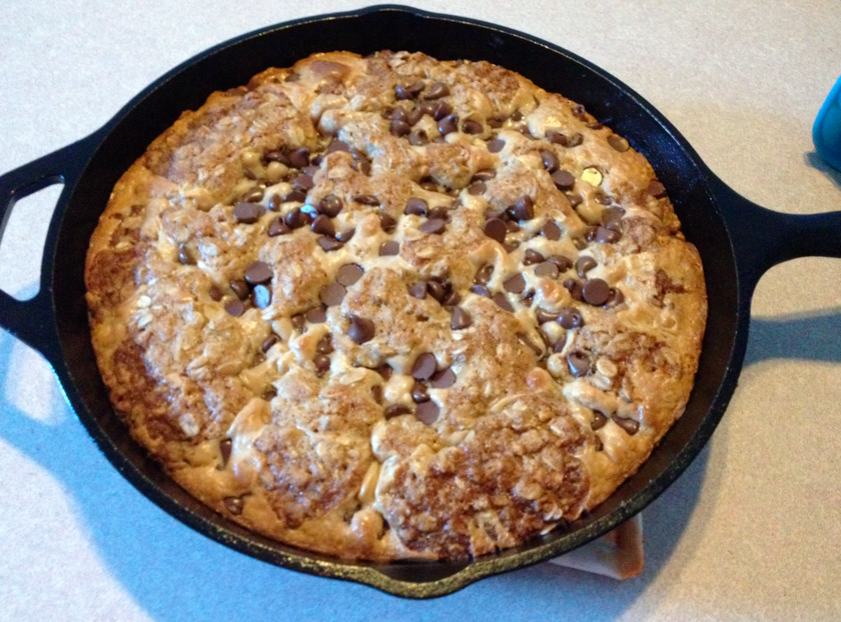

Heavenly Skillet Cookie


Ingredients
  • 1/2 cup unsalted butter, melted
  • 3/4 cup light brown sugar, packed
  • 1 large egg
  • 2 teaspoons vanilla extract
  • 3/4 cup all-purpose flour
  • 1/2 teaspoon baking soda
  • 1/2 teaspoon salt
  • 1 1/2 cups old-fashioned whole rolled oats (not quick cook or instant)
  • 14 ounces sweetened condensed milk
  • 1/2 cup creamy peanut butter
  • 1 cup semi-sweet chocolate chips
  • ice cream, optional

Directions
  1. Preheat oven to 350°, and spray cast iron skillet with cooking spray. (Alternatively, may use 9”x9” pan.)    
  2. In a large microwave-safe bowl, melt the butter. (May microwave butter to a browned-butter state.) To the melted butter, add sugar, egg, vanilla, and whisk or stir vigorously to combine, for about 1 minute. Add the flour, baking soda, salt; stir until just incorporated. Add the oats and stir to combine. Pour slightly less than three-quarters of the dough into the skillet, reserving about 1 1/4 cups to be crumbled on at the end; set skillet and reserved dough aside.
  3. In a small bowl, combine sweetened condensed milk and peanut butter and stir until smooth. Pour mixture over the dough in the skillet. Drop tablespoon-sized chunks of the reserved dough into the skillet, then sprinkle with chocolate chips.
  4. Bake for about 25 minutes, or until edges begin to barely crisp up and most of the top surface of the cookie has set. The center may not be completely set.
  5. Cookie may be served immediately; optionally serve it with ice cream. Extra cookie may be stored in an airtight container at room temperature or in the refrigerator for up to 5 days, reheating gently in the microwave before serving leftovers if desired.
Yield/Time
8 servings
40 minutes

Source (for original): Averie Cooks

Thursday, October 3, 2013

Focaccia Bread!

When I think of my favorite foods, the train of thought generally goes down the line of sweets, breads, pasta, cheese, milk, anything else dairy, fruit....

Basically, I really love food. 

 Especially if it's not very good for me.

Depending on my mood, breads even give sweets a run for their money. I'm not even that picky about bread. (Not nearly as much as I am with sweets, at least.) If it's good & moist and can be described as bread... yeah, I'll probably eat it. And if you add a yummy topping.... you can see where this is going.


When I saw this bread on Pinterest that could be made in an hour, and had a butter-parmesan-Italian seasoning topping, I knew I had to try it. 
 
My only concern, when looking at this recipe, is that it required the use of a cast-iron pan. I'm afraid of cast-iron. I don't even think that I have a real reason, it's just intimidating. However, Nate loves it, and I love to jump on anything that will impress my husband, so I gave it a shot.... 


Focaccia Bread

(For those wondering -like I was- it's pronounced \fō-ˈkä-ch(ē-)ə\. Foe-ka-chia.)


Ingredients
  • ¾ cup warm water   
  • ½ teaspoon granulated sugar
  • 1 ½ teaspoons yeast
  • 2 tablespoons olive or canola oil
  • 2 cups all-purpose flour, divided
  • ½ teaspoon salt
  • 3 tablespoons unsalted or salted butter, melted
  • 1 tablespoon grated parmesan
  • ½ teaspoon Italian seasoning

Instructions
  1. Place water and sugar in a large mixing bowl. Stir until sugar dissolves. Sprinkle yeast over the water and stir a few times. Let sit until foamy, about 5 minutes. Turn the mixer on low speed and add 1 cup of flour and salt. Mix until combined. Add oil and mix well.
  2. Gradually add as much of the remaining cup of flour as you can, and mix until the dough pulls away from the sides of the bowl.
  3. In the meantime, preheat the oven to 220°, then turn it off. Keep the door closed. Grease the skillet.
  4. Place dough onto a floured surface and fold the dough few times until it's smooth and not sticky. Shape into a ball. Roll out the dough to a circle the size of the skillet. Place in skillet. Stretch up the sides. Place in the oven for 20 minutes.
  5. Take the skillet out of the oven and preheat the oven to 400°. Make indentations in the dough with your fingers.
  6. Mix melted butter, parmesan and seasoning in a small bowl. Brush the dough with half the butter. Place skillet with dough in the preheated oven and bake 20 minutes, or until golden brown. Brush with remaining butter. Let cool until safe to the touch and slice. Serve.
Yield/Time
8 slices
1 hour

Nutrition Facts
181 calories/slice

Source (for original): Crunchy Creamy Sweet 

We all agree that this bread is AMAZING. Nate loved it (and took some to work), and I ate quite a bit too. When I gave Gabriel some as part of his snack, he ate it as fast as possible then asked for more 'bapa' (his word for bread).
 
Please excuse my even-worse-than-normal pictures.... my actual camera is MIA, and so I had to hurry and take some pictures with my phone. (Where, clearly, the camera is worse than my normal camera, which is saying something.) However, I had to try to get a picture of the bread before there was no bread left.... because between Nate, Gabriel, & I, that was a likely possibility.


You may not believe me, because both pictures are blurry and lame, but if you doubt you seriously need to make this bread yourself. It was easy and fast (yay!), and the flavor is amazing. I think I would actually add a touch of garlic to the top, but as I've said before.... I have a bit of a love affair with garlic. Without making any changes, this bread is amazing, and I will definitely be making this again!