PinIt!

Wednesday, August 31, 2016

Garlic Cheese Rolls (updated)

Confession time: I am one of those people who cannot leave a recipe alone. If you know me in person, and I've ever made something for you, you probably know that about me. "Let me know what you think I should do differently!" is one of the first things I say when I give food to people. I love to tweak things until I decide they are absolutely, truly perfect.

It's not my fault though, my husband encourages me.

This is one of those recipes. I originally posted this awhile ago, when I first made it. I was so excited that it turned out so well, I had to share right away! Now it's been a couple years, and I think at this point I actually have it to my level of perfect. With minimal changes, too. We'll see though. You know me. ;)

These rolls are a perfect addition to a dinner, or great to just snack on. (Warning: they are addicting.) They are wonderfully cheesy, with just the right amount of garlic and butter. (Another warning: I really like garlic. Really, really like garlic. You may want to cut down if you are not a huge fan. Or just throw caution to the wind and try it anyways, because these rolls are amazing.) I think my favorite part is that they are actually rolls vs. a biscuit-- they are great to peel apart and eat. That just might be me though...
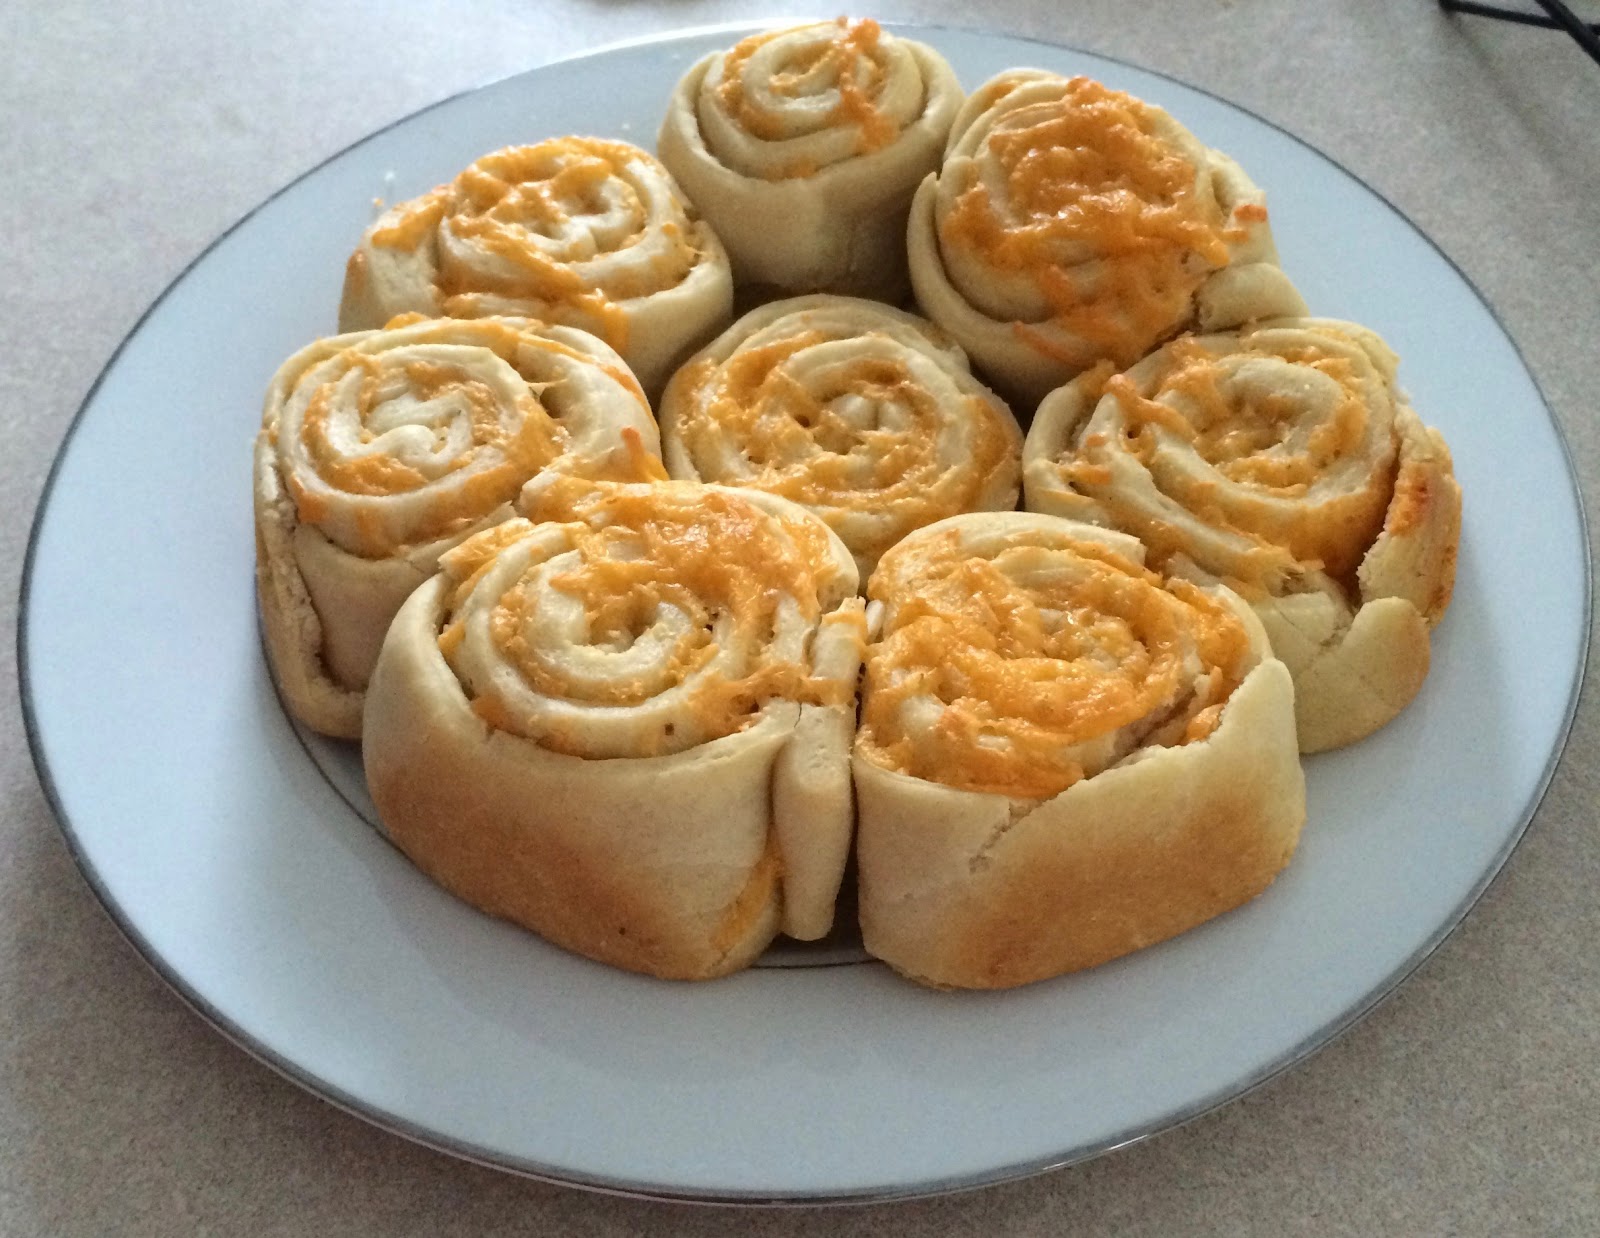
Garlic Cheese Rolls


Ingredients
  • 2 3/4 - 3 1/4 cups all-purpose flour
  • 2 1/4 teaspoon active dry yeast
  • 1/4 teaspoon salt
  • 1 cup warm water (120°-130°)
  • 2 tablespoons vegetable oil
  • 1/2 cup butter, softened
  • 2 teaspoons Garlic Garlic (or garlic powder)
  • Additional herbs/seasonings, optional
  • 2 1/2 cups cheese (mozzarella, cheddar, or colby jack)
Directions
  1. In a large mixing bowl, combine 1 1/4 cups flour, yeast, and salt; add water and oil. Beat on low speed for 30 seconds; then scrape bowl. Beat on high speed for 3 minutes. Knead in another 1 1/2 cups flour; adding up to 2 cups if needed. Knead for 6-8 minutes, to make a moderately stiff dough that is smooth and elastic.
  2. Cover, let rest for 10 minutes. Grease 3 8" cake pans, or 1 9"x13" pan; set aside. Note: DO NOT use metal cake pans. I've tried it multiple times, and it may just be my pans, but they stuck very badly.
  3. Meanwhile, beat together butter and garlic, adding additional seasonings as desired.
  4. Roll dough out into large rectangle (approximately 24”x12”). Spread garlic butter to within 1” of edge. Sprinkle with 2 cups desired cheese. Roll up jelly-roll style.
  5. Slice into 18-20 rolls, then place prepared pans. Sprinkle with remaining cheese. Let rise in a warm place for 30 minutes.
  6. Preheat oven to 350°.
  7. Place pan(s) on center rack, bake for 20-25 minutes or until golden brown. Remove to wire rack to cool.

Yield/Time
18-20 rolls
1 1/2 hours
Nutrition Facts *I calculate nutrition facts for reference only, this is not done scientifically
173 each/20 rolls


Source (for original): Better Homes & Gardens (dough), and the loose idea for the rolls came from a blog that no longer exists.
Remember, comments are loved! What's your favorite go-to roll?

Tastefully Simple info: If you are interested in making a purchase, you can purchase through my page, or just search and select "Serena Lee" as your consultant. Obviously, if you are not local and already have a consultant.... purchase through them online, or contact them! Shop local, as always! Disclaimer: I am paid a small amount with each purchase, based on sales, made through myself as a consultant. You are helping to support my baking addiction, thank you! ;)

Monday, August 29, 2016

Cinnamon Rolls & Icing

Now, I know we've had lots of conversations about homemade vs. storebought items. (Well, they've been mainly one-sided, but that's OK.) Homemade cinnamon rolls are another one of those things that are about 1000x better when homemade. I've been known to buy my share of canned cinnamon rolls, but they seriously cannot compare to homemade. 

And I know, I know--who has the time to make cinnamon rolls from scratch, every time they want cinnamon rolls? Not this mama. That's what's great about these-- make 1 batch, eat a pan, and have 2 more in the freezer for another day. (Or give them away, that works too.) 
Note: you can freeze the rolls at any point. Unrisen in the pan: cover tightly with plastic wrap & aluminum foil. Remove them, allow them to thaw and rise, and continue the baking and icing process. Baked but unfrosted: thaw, warm for a few minutes in the oven, and ice while warm.

Don't be deterred by the number of steps! These do take some time to make, but I promise you--they are worth it! You'll know it when you bite into the cinnamon, creamy-covered goodness. 

Speaking of creamy-covered goodness... Originally, I made this with a heavy cream based icing. (And that's the only one I've ever remembered to take a picture with.) Not really my thing, to be honest. I get rave reviews when I share it, but Nate and I both prefer cream cheese bases for an icing like this. Not just the consistency; you can make either to whatever consistency you prefer. The cream cheese taste really hits the spot with cinnamon rolls. However, I wanted to include both--take your pick, or use whatever icing recipe you prefer! 

Printable Recipe (all)

Printable Recipe (cinnamon rolls)
Cinnamon Rolls
Ingredients
  • 1 1/3 cups Milk
  • 1/3 cup Vegetable Oil
  • 1/3 cup Sugar
  • 1 1/2 teaspoons Active Dry Yeast
  • 3 cups All-purpose Flour, separated
  • 1/3 heaping teaspoon Baking Powder
  • 1/3 teaspoon Baking Soda
  • 1/3 heaping tablespoon Salt
  • 8 - 10 2/3 tablespoons Melted Butter
  • 2/3 cup cinnamon/sugar mix
  • Desired icing recipe

Directions
  1. Heat the milk, oil, and sugar in a saucepan over medium heat to just below a boil. Set aside and cool to warm. Sprinkle the yeast on top and let it sit on the milk for 1 minute.
  2. Add 2 2/3 cups flour. Stir until combined, then cover and set in a warm place for 1 hour. In the meantime, coat 3 cake pans (disposable or regular) with cooking spray.
  3. Remove the cover and add the baking powder, soda, salt, and remaining flour. Stir thoroughly to combine. (At this stage, may refrigerate for up to 3 days, punching down the dough if it rises to the top of the bowl.)
  4. On a floured surface, roll the dough into a large rectangle, about 30”x10”. The dough should be thin.
  5. To make the filling, pour melted butter over the surface of the dough, then spread evenly. Generously sprinkle cinnamon/sugar mix over the butter.
  6. Roll the rectangle tightly. Work slowly, being careful to keep the roll tight. (The filling will ooze.) Pinch the seam together and flip the roll so that the seam is face down.
  7. Slip a cutting board underneath the roll and cut into 1/2” slices. Place the sliced rolls in the pans, being careful not to overcrowd. (Each pan will hold 7-9; 3rd pan is for end pieces.)
  8. Cover all the pans and let rise for at least 20 minutes before baking.
  9. Preheat the oven to 375°F.
  10. Remove the cover and bake for 15 to 18 minutes, until golden brown.
  11. While the rolls are baking, prepare desired recipe for icing.
  12. Remove pans from the oven. Immediately drizzle icing over the top.

Yield/Time
Servings: 11 (2 rolls each)
Prep Time: 2 Hours Cook Time: 30 Minutes
Nutrition Facts *I calculate nutrition facts for reference only, this is not done scientifically
173/roll without icing
213/roll with heavy cream icing
241/roll with cream cheese icing

Cream Cheese Icing for Cinnamon Rolls
Note: this makes icing for just over 1 pan! Multiply by 2 if doing all pans at once.

Ingredients (per pan of rolls)
  • 4 ounces cream cheese, softened
  • 3/4 cup powdered sugar
  • 2-3 tablespoons milk

Directions
  1. In a large mixing bowl, mix together the cream cheese, powdered sugar, and milk to desired consistency.
  2. Drizzle over prepared cinnamon rolls.
Yield/Time
5 minutes

Nutrition Facts *I calculate nutrition facts for reference only, this is not done scientifically
68 per roll

Vanilla Cream Glaze for Cinnamon Rolls
Note: this makes icing for just over 1 pan! Multiply by 2 if doing all pans at once.

Ingredients (per pan of rolls)
  • 1/2 heaping cup of powdered sugar
  • 1/4 teaspoons vanilla extract
  • 1/4 cup heavy cream
  • milk

Directions

  1. In a large mixing bowl, combine sugar, heavy cream, and vanilla until mixture resembles a thick batter.
  2. If needed, add milk one tablespoon at a time, stirring until smooth – about 3-5 minutes.
Yield/Time
5 minutes
Nutrition Facts *I calculate nutrition facts for reference only, this is not done scientifically
40 per roll

Source (for original): Cinnamon Rolls: The Pioneer Woman; Heavy cream frosting: How Sweet It Is; Cream Cheese Icing: Love Grows Wild

Remember, comments are loved!
What is your favorite way to have cinnamon rolls?

Saturday, August 27, 2016

Brownie Batter Dip


I have a serious love for brownie batter, that no amount of salmonella warnings can deter. In the dorms in college, I made brownies at least every other week...then gave away most of the brownies. (To the point that the boyfriend of one of my friends just called me Brownie. I really don't think he knew my name.) I just wanted the batter!

I still have the tendency to eat more brownie batter than I should, but I found another source for my brownie batter--one that doesn't include the risk of salmonella. This dip is delicious, perfectly satisfies my craving for brownie batter, and is great to share! (In fact, this dip should be shared. It would be entirely too easy to eat the whole thing in one sitting. Plan on having friends over, or taking this to work or a party!)

This dip takes only minutes to prepare, and can be served immediately! Or, you can make it and store it in the fridge until the party--the texture is great even after being refrigerated for awhile!

Brownie Batter Dip

Ingredients
  • 8 ounces cream cheese, softened to room temperature
  • 1/4 cup butter, softened to room temperature
  • 2 cups powdered sugar, plus more for a stiffer consistency, if needed
  • 5 tablespoons all-purpose flour
  • 5 tablespoons cocoa powder
  • 2 tablespoons brown sugar
  • 1 teaspoon vanilla
  • 2-4 tablespoons milk
  • Chocolate chips for garnish (optional)
  • Pretzels, strawberries, graham crackers, animal crackers, apples for dipping


Directions
  1. In a large mixing bowl, whip together the cream cheese and butter until light and fluffy, 1-2 minutes. Add 2 cups powdered sugar. Mix well.
  2. Add the flour, cocoa powder, brown sugar, vanilla and 2 tablespoons milk. Mix until fluffy and smooth.
  3. Add additional milk, if needed, until desired consistency is reached. (Should be easy to dip.) Garnish with chocolate chips, if desired.
Yield/Time
2 1/2 cups (20 servings of 2 tablespoons each)
10 minutes
Nutrition Facts
140/2 tablespoons *I calculate nutrition facts for reference only, this is not done scientifically

Source (for original): Mel’s Kitchen Cafe

Remember, comments are loved! What's your favorite dip recipe? 

Thursday, August 25, 2016

Chocolate Peanut Butter M&M Cookies

If you follow my page on Facebook, you probably saw my (teaser) post about perfecting my new cookie recipe. These things are AMAZING. I've discovered two things recently: 1, cornstarch seriously makes the cookie. 2, freezing dough for an hour before baking makes a huge difference in texture. 

I've wanted to do something slightly different with my base cookie recipe, and I needed to use up some of my chocolate peanut powder before it outdated, so I decided to experiment. Experiment #1, while everyone thought it was great, needed some changes. A few changes later... these cookies are fabulous! They are perfectly soft, full of lots of chocolate chips and M&M's, just barely a taste of peanut butter, and the perfect amount of chocolate!

Printable Recipe
Chocolate Peanut Butter M&M Cookies

Ingredients
1/2 cup butter-flavored Crisco
1/2 cup granulated sugar
1/2 cup packed light brown sugar
2 large eggs
1/2 teaspoon pure vanilla extract
1 1/4 cups all purpose Flour
1 tablespoon unsweetened cocoa powder
1/4 cup + 3 tablespoons chocolate peanut powder
1/2 teaspoon baking soda
1 1/2 teaspoons cornstarch
1/2 teaspoon salt
3/4 cup mini chocolate chips
3/4 cup mini M&M’s

Directions
  1. Place Crisco and sugars into a stand mixer, cream until well combined. Add egg and vanilla, beating until well combined. Slowly add flour, cocoa powder, chocolate peanut butter powder, baking soda, cornstarch, and salt. Hand mix in chips and M&M’s.
  2. Scoop dough (or form into balls) and place onto a parchment lined baking sheet. (Spacing does not matter, as long as they do not touch.) Freeze for 1 hour.
  3. Preheat oven to 350°.
  4. Remove cookie dough from freezer, and place 2” apart on parchment lined baking sheet. Bake for 10-13 minutes or until edges are set. Let cookies cool for 5 minutes before transferring to cooling rack. Serve and enjoy.

Yield/Time
2 dozen
Prep/total time: 2 hours
Nutrition Facts
130 calories each (30 ct) *I calculate nutrition facts for reference only, this is not done scientifically


Source (for original): Picky Palate

Remember, comments are loved! Have you tried any of the peanut powders? What's your favorite recipe with them?

Tuesday, August 23, 2016

Bagels

I am, truthfully, not much of a breakfast person. I would be fine with skipping breakfast most days. 

Except when I have bagels. I could eat bagels every day, for multiple meals. (And sometimes I do! It's so easy to take bagels to work for lunch!) The problem is, those Lender's egg bagels that I can get addicted to are NOT cheap. So, of course, I have to make them myself! 

It's even more important to do it from scratch when there are 3 other people in this house that like bagels... Gabriel can eat 1 1/2 when he's really hungry in the mornings. (Which means that 1 package of the store bought bagels doesn't even last 2 days here.) 

I've tried a few different bagels recipes, but this is my favorite so far! These seem to last pretty well, without drying out. The flavor is great, and they are easy to do. (Don't let the number of steps discourage you! It's a longer process, but the steps are easy and it's worth the time!) 

This is a basic bagel recipe. In step 7, if you want toppings, just dip the wet bagels right in a bowl of toppings. Or, if you wanted to, you could add some things right to the dough. (Onion, etc.) 

Printable Recipe


Bagels


Ingredients
Sponge
1 teaspoon instant yeast
4 cups bread flour
2 1/2 cups water, room temperature
Dough
1/2 teaspoon instant yeast3 3/4 cups bread flour2 3/4 teaspoons salt2 teaspoons malt powder
To Finish
1 tablespoon baking soda
Sesame seeds, poppy seeds, salt, rehydrated dried minced garlic or onions, chopped onions that have been tossed in oil, or any other desired topping (optional)

Directions
  1. To make the sponge for the bagels: stir yeast into the flour, then stir in the water until it forms a sticky, thick batter. Cover the bowl with plastic wrap and leave it in a warm place for about 1-2 hours or until the mixture is foamy, bubbly and almost double in size. *Tip: I turn my oven on for just a minute or to, til it just starts to heat up, then place my dough in there to rise. It's just slightly above room temp, and rises a little faster. Be careful to not let your oven get too warm, if you try this!
  2. To make the dough, stir in the rest of the yeast to the sponge using the dough hook of a stand mixer. Stir in 3 cups of flour, salt and malt powder. Slowly add the remaining 3/4 cup flour, while kneading for 6 minutes. At this point, the dough should be soft, smooth and firm.
  3. Divide dough into 12-24 pieces, depending on desired size of bagels. Roll dough into smooth balls and place on lightly greased parchment paper. Cover rolls with plastic wrap or a damp towel and let rest for 20 minutes or so.
  4. Line 2 baking sheets with parchment paper and lightly spray with non stick cooking spray. Take each roll and carefully form a hole into the center, forming a bagel.
  5. Place each bagel 1-2” apart on the prepared pans, and cover loosely with plastic wrap or a damp towel. Let the pans sit at room temperature for about 20 minutes.
  6. When ready to bake the bagels, preheat the oven to 500° with the two racks set in the middle of the oven. Bring a large pot of water to a boil, and add the baking soda.
  7. Gently drop the bagels into the water, boiling only as many as comfortably fit. After 1 minutes flip them over and boil for another minute. For chewier bagels, extend the boiling to 2 minutes per side. If toppings are desired, do so as soon as they come out of the water.
  8. When all the bagels have been boiled, place the pans on the 2 middle shelves in the oven. Bake for approximately 5 minutes, then rotate the pans, switching shelves and giving the pans a 180° rotation. After the rotation, lower the oven setting to 450° and continue baking for about 10-15 minutes, or until the bagels turn light golden brown. Continue to alternate pans every 5 minutes.
  9. Remove the pans from the oven and cool the bagels 5-10 minutes before removing to a cooling rack.

Yield/Time
12-24 bagels, depending on size *I like to do 24, that's a good size bagel for our family. 12 would make very large bagels!
3 hours
Nutrition Facts
286 (12 ct), 191 (18 ct), 143 (24 ct) *I calculate nutrition facts for reference only, this is not done scientifically


Source (for original): Lauren’s Latest

Remember, comments are loved! What's your go-to breakfast?

Sunday, August 21, 2016

Crispy Garlic Parmesan Chicken & Zucchini

Anyone still have buckets of zucchini? As in, literally bucketfuls of zucchini? That's the way it was at my grandparent's/mom's garden this year, but it's always like that. I have quite a bit in the freezer, but they keep telling me to take more home. Who am I to say no? ;)

I love to just lightly batter and fry it, but this year I made the effort to do more with it. That meant there was quite a lot of "zucchini" searches on Pinterest and my favorite blogs.

This recipe struck me as soon as I saw the title-- garlic, parmesan, chicken, and zucchini all in one? Yes, please!! I am not a huge fan of frying chicken, but trust me--this is worth it!! This is crispy, golden perfection, with tons of zucchini (and/or summer squash!) to go with it!

We had almost as much summer squash as zucchini, so I of course had to add summer squash too. Gabriel is currently going through an "I don't like summer squash" phase, which can be interesting. While he was more than willing to eat his zucchini and chicken, I had to convince him to eat the summer squash. How I did it? Reminded him that he likes garlic and parmesan, and this has lots of each. And, that summer squash is basically the same as zucchini, we pick them from plants that look just alike. 

I love it when I successfully use logic on my 4 year old. It make me feel like maybe we've got this parenting thing down. (Until, you know, there is a full scale temper tantrum because I did something like stir his chocolate milk when he wanted to.) 

Hopefully, if you are feeding this to small children, you have as much luck as I did getting them to eat their veggies. (Well, this time, at least.) 

Printable Recipe
Crispy Garlic Parmesan Chicken & Zucchini

Ingredients

  1. 5 Tablespoons butter, divided
  2. 1/4 cup Italian breadcrumbs
  3. 1/4 cup plus 1 Tablespoon grated parmesan, divided
  4. 2 tablespoon flour
  5. 3 teaspoons Garlic Garlic (or garlic powder, or 3 garlic cloves), divided
  6. 2 Chicken Breasts, sliced in half
  7. 1 medium-large zucchini or summer squash, sliced
  8. Salt
  9. Pepper
Directions
  1. In a large skillet, over medium heat, melt 3 tablespoons butter.
  2. Melt remaining 2 tablespoons of butter in a shallow dish. In another shallow dish combine breadcrumbs, parmesan cheese, flour, and 2 teaspoons Garlic Garlic. (If using garlic cloves, see step #4.) Dip the chicken in the butter, and then coat in the bread crumb mixture and place in skillet.
  3. Cook on each side for about 4-7 minutes until the outside is crispy and the chicken is cooked throughout. (Will depend on thickness of breasts.) Set aside on plate.
  4. Add the zucchini to the skillet and saute until tender. (If using garlic cloves, add with the zucchini.) Add salt, pepper, remaining parmesan, and remaining garlic. Add the chicken back to the skillet and heat for a couple minutes.
  5. Serve immediately.

Yield/Time
4-6 servings
30-40 minutes
Nutrition Facts
362 per half breast *I calculate nutrition facts for my use only, this is not done scientifically


Source (for original): The Recipe Critic

Remember, comments are love! What's your favorite way to serve zucchini?
Tastefully Simple info: If you are interested in making a purchase, you can purchase through my page, or just search and select "Serena Lee" as your consultant. Obviously, if you are not local and already have a consultant.... purchase through them online, or contact them! Shop local, as always! Disclaimer: I am paid a small amount with each purchase, based on sales, made through myself as a consultant. You are helping to support my baking addiction, thank you! ;)